
MY STORY - WHY THIS RECIPE IS SO SPECIAL TO ME
My love for tiramisù began during a visit to Italy in the early 1990s.
At that time, I had already made up my mind that I wanted to become a chef. But before I committed myself completely to that dream, I felt I needed to travel. I wanted to explore different cultures, experience their food firsthand, and discover whether my palate was ready for the culinary journey I was about to undertake.
I believed that becoming a chef meant more than knowing how to cook. It meant learning to taste, to observe, to understand ingredients, and to appreciate the stories behind the food we eat.
During my time in Italy, a friend who had been living there introduced me to tiramisù.
To be honest, I was sceptical at first. It looked rather simple, and I wondered what made this dessert so special. But when it arrived at the table, the aroma of coffee and the rich fragrance of vanilla immediately caught my attention. One taste was enough to change my mind. The balance of bitter coffee, delicate sweetness, and creamy mascarpone was everything a dessert should be.
It was love at first bite.
Since then, tiramisù has become one of my favourite desserts and one of my most dependable recipes. It is the kind of dessert I can return to when I want something familiar, comforting, and elegant without unnecessary complications.
This homemade tiramisù layer cake brings that memory to life in a slightly different way. Instead of traditional ladyfinger biscuits, I use a delicate Italian sponge cake, allowing the coffee to soak into each layer while the mascarpone cream brings everything together.
What I love most is that it reminds me of the beginning of my journey as a chef, when curiosity led me to places, I had never been and flavours I had yet to discover.
My trip to Italy helped set everything in motion, and I have never regretted taking that first step.
Sometimes, a single dessert can become more than a favourite. It can become a reminder of who we were, what we dreamed of, and how far we have travelled since then.
And this is one of those desserts for me.

Tiramisu Layer Cake
Course: DessertCuisine: ItalianDifficulty: Intermediate12
servings30
minutes4
hours40
minutesKeep the screen of your device on
Ingredients
- 1. Italian Sponge Cake
125 g cake flour, sifted
1 pinch fine salt
5 g baking powder
4 large eggs, separated and at room temperature
100 g caster sugar, divided
½ teaspoon vanilla extract
2 tablespoons hot water, approximately 30 ml
- 2. Coffee Soaking Mixture
240 ml strong espresso or freshly brewed strong coffee, cooled
1–2 tablespoons Marsala wine, dark rum, brandy, or coffee liqueur, optional
½ teaspoon vanilla extract, optional
- 3. Mascarpone Cream Filling
335 g mascarpone cheese, cold
360 ml heavy whipping cream, cold, preferably at least 35% fat
60 g icing sugar, sifted
1 teaspoon vanilla extract
1 large pasteurised egg yolk, optional, for a more traditional tiramisù-style flavour
Note on the filling: This version uses a mascarpone and whipped-cream filling for a light, stable texture. The optional pasteurised egg yolk adds richness. If you prefer to avoid egg entirely, omit it and proceed with the remaining ingredients.
- 4. Finishing
20–25 g unsweetened cocoa powder, for dusting
Dark chocolate shavings, optional
Method
- STEP 1 — Prepare the Oven and Cake Tin
1. Preheat the oven to 170°C using conventional heat.
2. Lightly grease a 20 cm round cake tin.
3. Line the base with baking paper and lightly grease the sides.
4. Sift the cake flour, baking powder, and salt into a bowl. Set aside.
Chef Sandra’s tip: Prepare all your ingredients before beginning the sponge. Sponge cake depends on incorporated air for its light texture, so once the batter is ready, it should go into the - STEP 2 — Whip the Egg Whites
1. Place the egg whites in a clean, dry mixing bowl. Make sure the bowl and whisk are free from grease.
2. Using an electric mixer, beat on medium speed until the whites become foamy.
3. Gradually add approximately half of the caster sugar, continuing to beat.
4. Increase the speed to medium-high and whip until the whites form glossy, stiff peaks.
5. Set aside while preparing the yolk mixture.
The egg whites should hold their shape when the whisk is lifted, but they should not look dry or grainy.
Why this matters: The air incorporated into the egg whites helps the sponge rise and creates its delicate, tender structure. - STEP 3 — Whisk the Egg Yolks
1. Place the egg yolks and remaining caster sugar in a separate large bowl.
2. Beat on medium-high speed for approximately 5–8 minutes, or until the mixture becomes pale, thick, and increased in volume.
3. Add the vanilla extract and mix briefly.
4. With the mixer on low speed, add the hot water gradually and mix until incorporated.
The mixture should fall from the whisk in a thick ribbon.
Chef Sandra’s tip: Do not add boiling water directly to the yolks. Use hot water that is not vigorously boiling, and add it gradually while mixing. - STEP 4 — Incorporate the Dry Ingredients
1. Add one-third of the sifted flour mixture to the yolks.
2. Mix gently on low speed or fold with a spatula until just combined.
3. Repeat with the remaining flour in two additions.
4. Stop as soon as no dry flour remains visible.
Avoid prolonged mixing, which can develop gluten and make the sponge heavy. - STEP 5 — Fold in the Egg Whites
1. Add approximately one-third of the whipped egg whites to the yolk mixture.
2. Fold gently to lighten the batter.
3. Add the remaining whites in two additions.
4. Use a spatula to cut through the centre, sweep along the bottom of the bowl, and fold the batter over itself.
5. Rotate the bowl as you work, stopping as soon as the mixture is evenly combined.
The batter should be light, airy, and gently flowing.
Important: Do not stir vigorously. The goal is to preserve as much air as possible so the cake rises without becoming dense. - STEP 6 — Bake the Sponge Cake
1. Pour the batter into the prepared tin.
2. Gently level the surface without pressing down on the batter.
3. Place the tin on the middle rack of the preheated oven.
4. Bake for approximately 30–40 minutes.
5. Begin checking after 30 minutes. The sponge should be lightly golden and spring back when touched gently in the centre.
6. Insert a skewer into the centre. It should come out clean or with a few dry crumbs attached.
7. Remove from the oven and leave the cake in the tin for 10–15 minutes.
8. Carefully release the cake and transfer it to a wire rack.
9. Allow it to cool completely before cutting.
Chef Sandra’s tip: Avoid opening the oven door during the early stages of baking. A sudden temperature change can cause an incompletely set sponge to collapse. - STEP 7 — Prepare the Coffee
1. Brew 240 ml of strong espresso or coffee.
2. Transfer it to a shallow bowl and allow it to cool completely.
3. If using alcohol, stir in the Marsala wine, rum, brandy, or coffee liqueur.
4. Add the optional vanilla extract if desired.
5. Taste the mixture. It should be aromatic and pleasantly strong, with enough bitterness to balance the sweetness of the cream.
For a non-alcoholic version, simply use the coffee and vanilla.
Chef Sandra’s tip: Coffee is the soul of this dessert. Choose a brew with a deep aroma and balanced bitterness rather than one that tastes burnt or excessively sharp. - STEP 8 — Prepare the Mascarpone Cream
1. Place the cold mascarpone in a large mixing bowl.
2. Add the sifted icing sugar and vanilla extract.
3. If using the optional pasteurised egg yolk, add it now and mix gently until incorporated.
4. Beat briefly on low speed until smooth. Avoid prolonged mixing, as mascarpone can become grainy if overworked.
5. In a separate clean bowl, whip the cold heavy cream until it forms soft to medium peaks.
6. Add one-third of the whipped cream to the mascarpone mixture and stir gently to lighten it.
7. Fold in the remaining whipped cream in two additions.
8. Continue folding until the filling is smooth, fluffy, and evenly combined.
The cream should hold its shape when spread but remain soft enough to create a delicate layer between the sponge.
Chef Sandra’s tip: Keep the ingredients cold, but ensure the mascarpone is workable. If it is too firm, let it stand for a few minutes before mixing. Stop as soon as the filling becomes smooth and stable. - STEP 9 — Slice the Sponge into Layers
1. Make sure the sponge is completely cool.
2. Place it on a stable cutting board.
3. Using a long serrated knife, trim the dome from the top if necessary.
4. Carefully slice the cake horizontally into three even layers.
5. Lift each layer gently and set aside.
If the sponge is very delicate, refrigerate it briefly before slicing to make it easier to handle.
Chef Sandra’s tip: Use small, gentle sawing movements rather than pressing the knife straight down. This helps prevent the sponge from compressing or breaking. - STEP 10 — Assemble the First Layer
1. Place the bottom sponge layer on a serving plate or cake board.
2. Brush or spoon approximately one-third of the cooled coffee over the sponge.
3. Distribute the coffee evenly, paying particular attention to the edges.
4. Allow the coffee to absorb for a moment.
5. Spread approximately one-quarter of the mascarpone cream over the sponge.
6. Smooth the cream into an even layer using an offset spatula.
Important: The sponge should be moist and fragrant, not saturated. Add the coffee gradually and stop before the cake becomes fragile. - STEP 11 — Add the Second Layer
1. Place the second sponge layer carefully over the cream.
2. Brush or spoon another third of the coffee over the surface.
3. Spread another quarter of the mascarpone cream evenly over the sponge.
4. Check that the cake remains level before proceeding.
If the cake begins to lean, gently adjust the position of the sponge before adding the final layer. - STEP 12 — Complete the Cake
1. Place the final sponge layer on top.
2. Apply the remaining coffee gradually and evenly.
3. Spread a thin layer of mascarpone cream over the top.
4. Use the remaining cream to cover the sides of the cake, if desired.
5. Smooth the surface with an offset spatula or leave soft, rustic swirls for a more relaxed presentation.
For a more traditional tiramisù appearance, keep the sides lightly coated and finish with a generous cocoa dusting.
For a more polished celebration cake, apply a thin crumb coat, refrigerate for 20–30 minutes, then add a final smooth layer of cream. - STEP 13 — Chill and Set
1. Place the assembled cake in the refrigerator.
2. Chill for at least 3–4 hours, preferably overnight.
3. Cover the cake carefully to prevent it from absorbing other refrigerator odours.
4. Before serving, check that the layers feel stable and the cream has set.
Chilling allows the coffee to permeate the sponge, the mascarpone cream to firm up, and the flavours to come together.
Chef Sandra’s tip: This cake is even better when made the day before serving. The extra resting time gives the sponge a lovely coffee aroma and makes the cake easier to slice neatly. - STEP 14 — Finish and Serve
1. Just before serving, place the cocoa powder in a fine-mesh sieve.
2. Dust the top evenly with a generous layer of cocoa.
3. Add dark chocolate shavings if desired.
4. For clean slices, use a sharp knife warmed in hot water and wiped dry between cuts.
5.Serve chilled, allowing the cake to stand briefly at room temperature only if you prefer a softer cream texture.
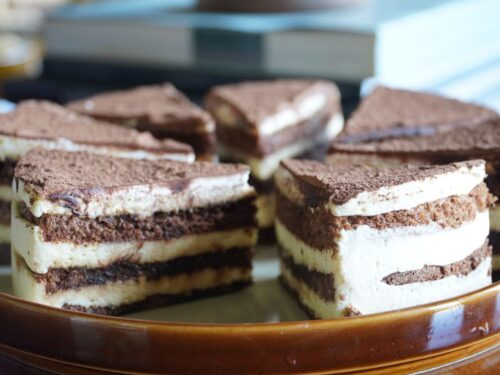
The finished cake should have distinct layers of coffee-infused sponge and creamy mascarpone, with the gentle bitterness of cocoa balancing every bite.
Notes
- The Secrets to a Beautiful Tiramisù Layer Cake
A light sponge starts with properly whipped eggs. Whip the whites to glossy peaks and fold them into the batter gently.
Do not overmix the flour. Excessive mixing can make the sponge tough and reduce its volume.
Use strong, cooled coffee. This delivers a more pronounced tiramisù flavour without requiring the cake to be soaked excessively.
Keep the mascarpone cream cold. Cold cream whips more effectively and helps the filling hold its shape.
Allow sufficient chilling time. The cake needs time to settle before it is cut and served. - Optional Flavour Variations
Marsala tiramisù cake: Add 1–2 tablespoons of Marsala wine to the coffee for a more traditional Italian flavour.
Dark chocolate finish: Sprinkle finely grated dark chocolate between the cream layers.
Extra vanilla: Increase the vanilla extract slightly if you prefer a warmer, more pronounced vanilla fragrance.
Two-layer version: Bake the sponge in two tins or cut it into two layers. Adjust the coffee and cream distribution accordingly. - Storage
- Store the cake covered in the refrigerator at 4°C or below.
- For the best quality, consume within 2–3 days.
- Because this version uses a whipped-cream filling, keep the cake chilled until serving.
- If freezing, wrap individual portions securely and freeze for up to 2 weeks for best quality. Thaw overnight in the refrigerator.