Caesar Salad Chicken Croquettes
16
servings45
minutes35
minutes300
kcalIngredients
- 1. Dutch-Style Chicken Croquette Filling
400 g boneless, skinless chicken thigh or breast
750 ml chicken stock, preferably homemade or good-quality
100 g unsalted butter
120 g all-purpose flour
1 small onion, finely minced
2 tablespoons finely chopped fresh parsley
1 teaspoon Dijon mustard
40 g finely grated Parmesan cheese
1 small garlic clove, finely grated
½ teaspoon freshly ground black pepper
¼ teaspoon ground nutmeg
Salt, to taste
1 egg yolk
Why chicken thigh? Chicken thigh tends to remain juicy and flavourful after simmering. Chicken breast is also suitable if you prefer a leaner, more delicate filling. Either way, the chicken should be cooked until tender and finely shredded or chopped.
Why a roux-based filling? Unlike ordinary potato croquettes, Dutch-style croquettes use a thick, creamy ragout. Butter and flour form the roux, while chicken stock creates a savoury sauce that sets firmly when chilled. This is what gives Dutch croquettes their characteristic creamy interior.
- 2. For the Breading
100 g all-purpose flour
2 large eggs
2 tablespoons milk or water
180–220 g fine dried breadcrumbs or panko
Neutral oil for deep-frying
Fine breadcrumbs give a traditional Dutch-style finish, while panko creates a more pronounced crunch. Either works well for this recipe.
- 3. For the Caesar Dressing
100 g mayonnaise
30 g finely grated Parmesan cheese
1 small garlic clove, finely grated
2 anchovy fillets, finely minced, or 1 teaspoon anchovy paste
1 teaspoon Dijon mustard
1–2 tablespoons fresh lemon juice
1 teaspoon Worcestershire sauce
1–2 tablespoons cold water, as needed
Freshly ground black pepper, to taste
- 4. For the Caesar Salad Garnish
1 small romaine lettuce heart
20–30 g Parmesan cheese, shaved
1 teaspoon lemon juice, optional
Freshly ground black pepper
Finely chopped chives or parsley, optional
Directions
- Step 1 — Cook the chicken
1. Place the chicken in a saucepan and pour in the chicken stock. The chicken should be mostly submerged; add a little water if necessary.
2. Bring the liquid to a gentle simmer over medium heat. Avoid a vigorous boil, which can make the chicken tougher and cause the stock to evaporate too quickly.
3. Cook until the chicken is completely tender and reaches an internal temperature of 74°C. Depending on the cut and thickness, this generally takes 15–25 minutes.
4. Remove the chicken from the stock and allow it to cool slightly.
5. Strain and reserve the cooking stock. Measure out 500 ml for the ragout; keep a little extra available in case you need to adjust the consistency.
6. Finely chop or shred the chicken into small, even pieces. Avoid leaving large chunks, as they can make the croquettes difficult to shape.
Chef's tip: Finely chopped chicken distributes more evenly through the ragout and makes the finished croquettes easier to bite into. The reserved stock is especially valuable because it carries the flavour of the chicken into the filling. - Step 2 — Prepare the chicken ragout
This is the most important stage of a Dutch-style croquette. The ragout must be rich and creamy, but firm enough to hold its shape once chilled.
1. Place a heavy-based saucepan over medium-low heat and melt the butter.
2. Add the finely minced onion and cook gently for 4–5 minutes until soft and translucent. Do not allow it to brown.
3. Add the garlic and cook for another 30 seconds, just until fragrant.
4. Sprinkle in the flour and stir continuously with a wooden spoon or whisk to form a thick paste.
5. Cook the roux over low to medium-low heat for 2–3 minutes, stirring constantly. This removes the raw flour taste without colouring the mixture too much.
6. Gradually pour in the reserved chicken stock, a little at a time, whisking thoroughly after each addition. Adding the liquid gradually helps prevent lumps.
7. Continue stirring as the mixture thickens. Once all the stock has been incorporated, cook gently for another 3–5 minutes, stirring frequently, until the sauce is very thick and smooth.
8. Add the chopped chicken, parsley, Dijon mustard, Parmesan, black pepper and nutmeg.
9. Stir until the chicken is evenly distributed throughout the ragout.
10. Taste and adjust the seasoning. Add salt cautiously, as the stock and Parmesan may already contain enough.
11. Remove the pan from the heat and allow the mixture to cool for 2–3 minutes.
12. Stir in the egg yolk until completely incorporated.
The finished ragout should be thick enough to mound on a spoon rather than flow like a sauce. If it appears loose, return it to low heat and cook a little longer, stirring continuously.
Why the consistency matters: A loose filling is difficult to shape and can escape through the breadcrumb coating during frying. The ragout should be soft and creamy when hot, but firm and scoopable once chilled. - Step 3 — Chill the ragout thoroughly
1. Transfer the ragout into a shallow tray or container.
2. Spread it into an even layer, ideally no deeper than 3–4 cm, so it cools more quickly.
3. Cover the surface and refrigerate promptly. Avoid leaving the mixture at room temperature for an extended period.
4. Chill for at least 4–6 hours, preferably overnight, until completely cold and firm.
Once chilled, the ragout should be thick enough to scoop and shape without running between your fingers.
Chef's tip: Preparing the ragout the day before is one of the best ways to organise this recipe. It makes the following day's shaping, breading and frying much easier. - Step 4 — Shape the croquettes
1. Remove the chilled ragout from the refrigerator.
2. Divide it into 12–16 equal portions.
3. With lightly dampened hands or two spoons, shape each portion into a small cylinder with rounded ends.
4. Aim for uniform sizes so all the croquettes fry at approximately the same rate.
5. Place the shaped croquettes on a parchment-lined tray.
6. Refrigerate for another 20–30 minutes if the mixture has softened during shaping.
For a refined dinner-party presentation, I prefer traditional elongated croquettes rather than round balls. Their shape is elegant and provides a good ratio of crisp crust to creamy filling. - Step 5 — Prepare the breadcrumb coating
Set up three shallow bowls.
• Bowl 1: Plain flour.
• Bowl 2: Eggs beaten with milk or water.
• Bowl 3: Breadcrumbs or panko.
Coat each croquette as follows:
1. Roll the croquette lightly in flour, covering every surface.
2. Shake off any excess flour.
3. Dip it into the beaten egg, turning to coat evenly.
4. Allow the excess egg to drip away.
5. Roll the croquette in breadcrumbs, gently pressing them onto the surface.
6. Inspect the croquette for gaps, cracks or exposed filling and patch these areas with additional breadcrumbs.
For extra protection, dip the croquette in egg and breadcrumbs a second time. This double coating is particularly useful for a creamy ragout filling.
Arrange the coated croquettes on a tray and refrigerate for another 20–30 minutes before frying.
Why double coating helps: It creates a stronger outer shell, reducing the chance of the ragout leaking into the oil. The coating also develops a more even, satisfying crunch.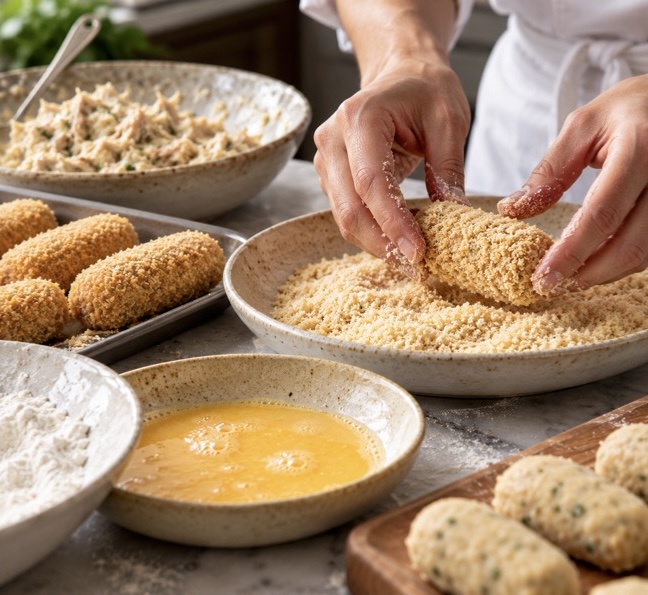
- Step 6 — Prepare the Caesar dressing
1. Place the mayonnaise in a mixing bowl.
2. Add the Parmesan, garlic, minced anchovies, Dijon mustard and Worcestershire sauce.
3. Whisk until smooth.
4. Add the lemon juice gradually, tasting as you go.
5. Add cold water a little at a time until the dressing reaches the desired consistency.
6. Season with freshly ground black pepper. Taste before adding salt.
7. Cover and refrigerate until ready to serve.
The dressing should be creamy, savoury and slightly tangy. It needs enough acidity to balance the richness of the fried croquettes.
Chef's tip: Make the dressing a few hours ahead so the flavours have time to develop. Stir it again before serving and add a few drops of lemon juice if it needs freshening. - Step 7 — Fry the croquettes
1. Pour neutral oil into a heavy-based saucepan or deep fryer, ensuring the vessel is no more than half full.
2. Heat the oil to 170–175°C.
3. Carefully lower 3–4 croquettes into the oil, depending on the size of your pan.
4. Fry for approximately 3–5 minutes, turning gently if necessary, until evenly golden brown and crisp.
5. Remove with a slotted spoon and drain briefly on a wire rack or paper towels.
6. Allow the oil to return to the correct temperature before frying the next batch.
Because the chicken is already cooked, the goal is to heat the filling thoroughly while crisping the exterior without burning the breadcrumbs.
Important frying tips:
• Keep the croquettes cold before frying.
• Do not overcrowd the pan, as this lowers the oil temperature.
• Do not handle the croquettes too roughly while they are frying.
• If they brown too quickly, lower the temperature slightly.
• If they become greasy or split, check whether the oil is too cool or the coating is incomplete.
Always handle hot oil carefully and never leave it unattended. - Step 8 — Prepare the salad garnish
1. Separate the romaine lettuce leaves and wash them thoroughly.
2. Dry the leaves completely using a salad spinner or clean kitchen towels.
3. Tear or cut the lettuce into bite-sized pieces.
4. Keep it chilled until just before serving.
5. Prepare the Parmesan shavings and any herbs you wish to use.
The lettuce should remain crisp and refreshing. It provides an essential contrast to the rich chicken ragout and crunchy coating. - Step 9 — Plate and serve
1. Spoon a small amount of Caesar dressing onto each plate, creating a neat pool or swoosh.
2. Arrange 2–3 hot chicken croquettes alongside the dressing.
3. Add a small bundle of crisp romaine lettuce.
4. Finish with Parmesan shavings, freshly ground black pepper and finely chopped chives or parsley.
5. Add a little extra dressing to the lettuce, if desired.
6. Serve immediately while the croquettes are hot and crisp.
For a dinner party, I recommend plating the croquettes individually rather than piling them together. A clean presentation with a few carefully chosen garnishes makes the dish look elegant without distracting from the food.
Keep the lettuce and dressing away from the croquettes until serving so the crust stays crisp for as long as possible.
Notes
- Chef's Notes
• Prepare ahead: Make the ragout the day before and chill overnight. Shape and bread the croquettes several hours before serving.
• Choose the right chicken: Thigh meat gives a richer flavour, while breast meat produces a lighter filling. Both work well.
• Do not rush the roux: Cooking the flour in butter removes its raw taste and helps the filling develop a smooth texture.
• Watch the moisture: A thick ragout is essential. If it is too soft, continue cooking it gently before chilling.
• Balance the Caesar flavours: Parmesan and anchovy provide savoury depth, while lemon juice and Dijon mustard cut through the richness.
• Serve immediately: Dutch-style croquettes are at their best straight from the fryer, when the crust is crisp and the centre is creamy.
• Keep the salad separate: Toss the lettuce with dressing only at the last moment to prevent wilting. - Make-Ahead Guide
• Chicken ragout: Prepare up to 24 hours ahead and refrigerate promptly.
• Shaped croquettes: Refrigerate covered until ready to coat or fry.
• Breaded croquettes: Refrigerate for several hours before frying.
• Caesar dressing: Prepare 1–2 days ahead and store in the refrigerator.
• Lettuce garnish: Wash and dry ahead, but dress immediately before serving.
• Fried croquettes: Best served immediately; avoid covering them while hot, as trapped steam softens the crust.
Keep perishable ingredients refrigerated at 4°C or below, and do not leave the chicken ragout at room temperature for extended periods. - My Final Thoughts
What makes this recipe so exciting for me is that it brings together two dishes I already love and gives them a completely new personality. The Dutch-style chicken croquette delivers that wonderful contrast of a crisp golden crust and a creamy, savoury centre, while the Caesar salad contributes freshness, acidity and the unmistakable flavour of Parmesan and anchovy.
It takes patience, preparation and a little technique, but that is exactly what makes the final result so rewarding. This is a dish I would happily serve when entertaining friends at home: elegant enough for a dinner party, comforting enough to feel familiar, and unusual enough to make everyone curious.
Sometimes, inspiration comes from another chef's clever idea. We take that inspiration into our own kitchen, refine it to our taste and discover something that becomes a favourite of our own.
And in this case, I can honestly say that combining Caesar salad with Dutch-style chicken croquettes is an idea I find difficult to resist.
From My Kitchen to Yours — Sandra Djohan