
Biscoff Tiramisu Cake
Course: DessertDifficulty: Easy, Intermediate
Servings
16
servingsPrep time
15
minutesCook ModeKeep the screen of your device on
Ingredients
- 1. Cookie and Coffee Layers
2 packages Speculoos or Biscoff cookies, approximately 64 cookies or 500–600 g depending on the package
240 ml (1 cup) strong brewed coffee, completely cooled
- 2. Whipped Biscoff Cream Filling
950 ml (4 US cups) heavy whipping cream, very cold, with at least 35% fat
225 g (8 oz) full-fat cream cheese, softened slightly until smooth but still cool
60 g (½ cup) powdered sugar, sifted
80–105 g (¼–⅓ cup) Biscoff spread, gently warmed until pourable
1 teaspoon vanilla extract, optional
- 3. Chocolate Ganache
170 g (approximately 1 cup) semi-sweet chocolate chips or finely chopped semi-sweet chocolate
180 ml (¾ cup) heavy cream
- 4. Decoration
50–75 g Biscoff spread, for drizzling
3–4 Biscoff cookies, crushed into fine crumbs
A few extra cookie pieces, optional
Directions
- STEP 1 — Prepare the Coffee
1. Brew a cup of strong coffee. Espresso or a strong filter coffee works particularly well because its slight bitterness balances the sweetness of the cookies and Biscoff spread.
2. Transfer the coffee to a shallow bowl and allow it to cool completely.
3. Keep the coffee at room temperature or slightly chilled before assembling the dessert.
Chef Sandra’s tip: Never dip the cookies into hot coffee. Heat can soften them too quickly, causing them to break apart and making the finished tiramisu overly wet. For a more pronounced coffee flavour, use stronger coffee rather than soaking the cookies for longer. - STEP 2 — Prepare the Cream Cheese Base
1. Remove the cream cheese from the refrigerator and allow it to soften just enough to become smooth and workable. It should not be warm.
2. Place the cream cheese in the bowl of a stand mixer fitted with the whisk attachment. Alternatively, use a hand mixer and a large mixing bowl.
3. Beat on medium speed until smooth and creamy, approximately 1–2 minutes. Stop and scrape down the sides and bottom of the bowl to remove any lumps.
4. Add the sifted powdered sugar and vanilla extract, if using.
5. Mix on low speed until the sugar is incorporated, then beat briefly until smooth.
Important: The cream cheese must be smooth before the cream is added. Any lumps at this stage will be difficult to remove later without overwhipping the filling. - STEP 3 — Make the Biscoff Whipped Cream
1. Make sure the heavy cream is thoroughly chilled. A cold mixing bowl and cold whisk attachment will also help the cream whip efficiently.
2. With the mixer running on low speed, gradually pour the cold heavy cream into the cream cheese mixture.
3. Increase the speed to medium and continue whipping until the mixture begins to thicken.
4. Reduce the speed to low and slowly add the warmed Biscoff spread. The spread should be fluid enough to pour but not hot.
5. Once the Biscoff spread is incorporated, increase the mixer speed to medium-high and whip until the filling forms soft to medium peaks.
6. Stop the mixer and check the consistency. The cream should hold its shape while remaining smooth, light, and spreadable.
The finished filling should be thick enough to create distinct layers without running into the cookies.
Chef Sandra’s tip: Watch the cream carefully during the final stage of whipping. Overwhipped cream can become grainy or separate. Stop as soon as the filling holds soft, defined peaks. If the mixture becomes too firm, do not continue beating.
For the best flavour: Start with 80 g of Biscoff spread and taste the filling. Increase to approximately 105 g if you prefer a more pronounced caramelised cookie flavour. Remember that the cookies, layer drizzles, and ganache will contribute additional sweetness. - STEP 4 — Prepare the Baking Dish
1. Select a clean, deep 23 × 33 cm baking dish or similar serving dish.
2. Spread a very thin layer of Biscoff cream over the bottom of the dish.
3. Smooth the cream into an even layer using an offset spatula or the back of a spoon.
This first layer acts as an adhesive for the cookies and helps prevent them from sliding while you assemble the dessert. - STEP 5 — Build the First Cookie Layer
1. Place the cooled coffee in a shallow bowl.
2. Take one Biscoff cookie at a time and dip it briefly into the coffee. A quick dip on each side is usually sufficient.
3. Lift the cookie immediately and allow excess coffee to drip back into the bowl.
4. Arrange the cookies in a single, even layer over the cream.
5. Break a few cookies into smaller pieces to fill any gaps around the edges.
The most important rule: Do not soak the cookies. Biscoff cookies absorb liquid quickly and will continue to soften as the dessert chills. Over-soaked cookies can make the tiramisu watery and difficult to portion. - STEP 6 — Add the First Biscoff Cream Layer
1. Spoon approximately one-third of the whipped Biscoff filling over the cookies.
2. Spread it gently from the centre toward the edges, taking care not to displace the cookies underneath.
3. Use an offset spatula to create an even layer.
4. Warm a small amount of Biscoff spread until pourable.
5. Drizzle a light ribbon of spread over the cream. Use just enough to add flavour without creating a thick, heavy layer.
The filling should cover the cookies completely, creating a smooth foundation for the next layer. - STEP 7 — Repeat the Layers
1. Dip another layer of Biscoff cookies briefly into the cooled coffee.
2. Arrange them neatly over the cream filling.
3. Add another portion of the Biscoff cream and spread evenly.
4. Drizzle lightly with warmed Biscoff spread.
5. Repeat with the remaining cookies and cream, distributing the filling to create attractive, balanced layers.
For a dish of this size, aim for three cookie layers and three cream layers, adjusting the arrangement according to the depth of your dish and the amount of filling available.
Finish with a smooth layer of Biscoff cream. Reserve enough cream to fill gaps and level the surface neatly.
Chef Sandra’s tip: Keep the cookie layers level and distribute the filling evenly. This gives each portion a beautiful cross-section and ensures that every bite contains cookie, coffee, and cream. - STEP 8 — Prepare the Chocolate Ganache
1. Place the chocolate chips or finely chopped chocolate in a heatproof bowl.
2. Pour the heavy cream into a small saucepan and heat gently until steaming and hot, with small bubbles appearing around the edges. Do not allow it to boil vigorously.
3. Pour the hot cream over the chocolate, ensuring that the chocolate is mostly covered.
4. Leave undisturbed for 2–3 minutes to allow the heat to melt the chocolate.
5. Begin stirring gently from the centre of the bowl, gradually working outward until the mixture becomes smooth, glossy, and evenly combined.
6. If a few pieces of chocolate remain unmelted, place the bowl over a pan of barely simmering water and stir gently until smooth.
7. Allow the ganache to cool until it is still pourable but no longer hot.
Chef Sandra’s tip: A smooth ganache depends on gentle heating and patient stirring. Avoid introducing too much air, which can create bubbles on the finished surface. If the ganache seems too thick, stir in a little warm cream, one teaspoon at a time. - STEP 9 — Finish with Chocolate Ganache
1. Pour the cooled, pourable ganache over the final layer of Biscoff cream.
2. Use an offset spatula to spread it evenly to the corners of the dish.
3. Gently tilt the dish if needed to help the ganache settle into a smooth, level layer.
4. Allow the surface to settle before covering the dish.
The ganache should form a thin, elegant chocolate layer that complements the sweetness of the Biscoff without overpowering the dessert. - STEP 10 — Chill and Set
1. Cover the dish carefully without allowing the covering to touch the ganache.
2. Refrigerate for a minimum of 4 hours. For the best texture and cleanest portions, chill overnight.
3. During chilling, the cookies soften and absorb some moisture from the cream, allowing the layers to come together.
4. Do not attempt to cut the dessert while it is still soft or warm.
Why overnight chilling is better: The filling becomes more stable, the flavours blend together, and the cookie layers develop a tender, cake-like texture while retaining enough structure to hold their shape. - STEP 11 — Decorate and Serve
1. Just before serving, gently warm the reserved Biscoff spread until it becomes pourable.
2. Drizzle it over the chocolate ganache in fine lines or an irregular pattern.
3. Sprinkle crushed Biscoff cookies over the top.
4. Add a few larger cookie pieces for height and texture, if desired.
5. Cut into 16 portions using a sharp knife. Wipe the knife clean between cuts for a neat presentation.
6. Serve straight from the refrigerator.
For a more refined presentation, use a flat spatula to lift each portion cleanly from the dish. Serve on chilled dessert plates for a restaurant-style finish.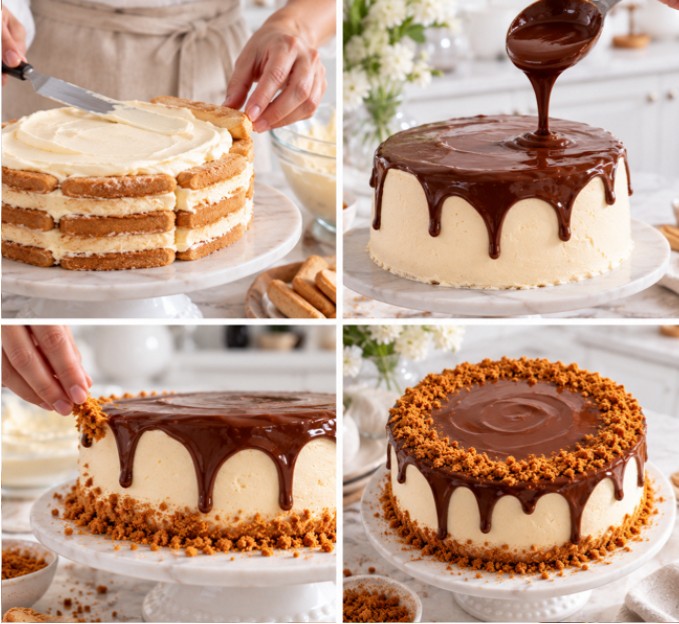
Chef Sandra’s Notes
- How to Achieve the Best Texture
• Use very cold cream. Cold heavy cream whips more effectively and helps create a stable filling.
• Start with smooth cream cheese. Beat it before adding the cream to avoid lumps.
• Do not oversoak the cookies. A brief dip is enough; the cookies will soften further during refrigeration.
• Keep the Biscoff spread only slightly warm. Hot spread can soften the cream and affect its structure.
• Do not overwhip. The filling should be thick and smooth, not grainy or buttery.
• Allow enough chilling time. Four hours is the minimum, but overnight gives the best result. - Common Problems and How to Fix Them
The filling is too soft.
The cream may not have been cold enough, or it may not have been whipped sufficiently. If the layers are already assembled, refrigerate the dessert for several additional hours. For future batches, use cold cream with at least 35% fat and stop whipping when the filling holds defined peaks.
The cream looks grainy.
It may have been overwhipped. Stop mixing immediately. If it is only slightly grainy, gently fold in a small amount of unwhipped cold cream by hand. If it has separated substantially, it may not recover its original texture.
The cookies are too soft or the dessert is watery.
This usually happens when the cookies have been soaked too long or the coffee has not been drained off properly. Dip quickly, use cooled coffee, and avoid adding extra liquid between the layers.
The ganache is too thick.
Let it cool slightly less, or gently stir in a small amount of warm cream until it becomes pourable.
The ganache is too thin.
Allow it to cool further before pouring. If it remains too thin, it may need a little more melted chocolate to achieve a suitable consistency. - STORAGE AND FOOD SAFETY
• Store the tiramisu covered in the refrigerator at 4°C or below.
• For the best flavour and texture, consume within 3 days.
• Do not leave the dessert at room temperature for more than 2 hours, or 1 hour in very hot conditions above 32°C.
• This recipe contains dairy and should remain refrigerated until serving.
• Freezing is possible, but the whipped cream texture may change slightly after thawing. If freezing, wrap portions securely and thaw overnight in the refrigerator.