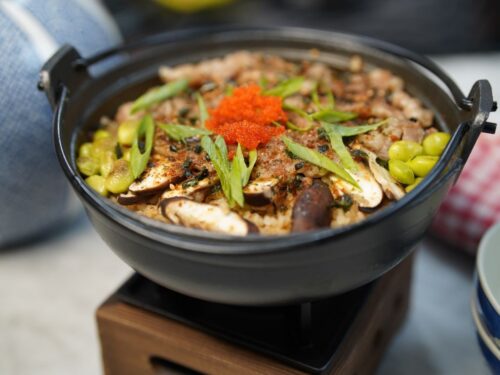
A comforting Japanese rice dish cooked in a savory dashi broth until the grains are tender and fragrant. This version combines thinly sliced beef, shiitake mushrooms, and a delicate soy-mirin sauce, finished with salmon roe, chives, and nori for a balance of umami, freshness, and texture.


Beef Kamameshi
Course: Lunch, DinnerCuisine: JapaneseDifficulty: Low3
servings1
hour30
minutesKeep the screen of your device on
Ingredients
- Dashi stock
1 litre mineral water
12 g dried shiitake mushrooms
10 g kombu (dried kelp)
- Kamameshi rice
360 g Japanese short-grain rice, washed
100 g thinly sliced beef
30 g fresh shiitake mushrooms, thinly sliced
360 ml prepared dashi stock
30 ml sake
10 ml light soy sauce
2 g salt
- Kamameshi sauce
5 ml soy sauce
5 ml mirin
10 ml prepared dashi stock
1 pinch cornstarch
A dash of fresh ginger juice
- To serve
20 g ikura (salted salmon roe)
1–2 tbsp chopped chives
Nori seaweed, finely shredded or crushed into powder
30 ml prepared kamameshi sauce for finishing, as needed
Directions
- Step 1 - Prepare the dashi stock
1. Pour the mineral water into a saucepan.
2. Add the dried shiitake mushrooms and kombu.
3. Place the pan over low heat and gradually warm the liquid to approximately 65°C.
4. Maintain the temperature at around 65°C for 1 hour. Do not allow the stock to boil.
5. Turn off the heat and carefully strain the stock through a fine-mesh sieve into a clean bowl.
6. Measure out 360 ml for cooking the rice and 10 ml for the sauce. Reserve the remaining stock for another use.
Chef's tip: Gentle heating helps extract the natural umami from the mushrooms and kombu without making the stock harsh or bitter. If you do not have a thermometer, keep the water hot but below a simmer. - Step 2 - Prepare the rice
1. Place the Japanese short-grain rice in a bowl.
2. Cover with cold water and gently swirl the rice with your fingers.
3. Drain the cloudy water and repeat until the water becomes clearer.
4. Drain the rice thoroughly in a sieve for about 10 minutes.
Chef's tip: Properly washing the rice removes excess surface starch and helps prevent the finished dish from becoming overly sticky. Japanese short-grain rice should still retain its naturally soft, slightly sticky texture. - Step 3 - Prepare the beef and mushrooms
1. Slice the beef into thin, bite-sized strips so it cooks quickly and evenly.
2. Trim the shiitake mushroom stems if they are tough.
4. Slice the mushrooms into thin pieces.
5. Keep the beef and mushrooms separate and ready beside the stove.
Chef's tip: Choose tender beef cuts such as sirloin or tenderloin. If using a firmer cut, slice thinly against the grain. - Step 4 - Combine the rice and seasonings
1. Place the washed and drained rice in a heavy-bottomed saucepan with a tight-fitting lid, or use a traditional Japanese kamameshi pot.
2. Pour in 360 ml dashi stock.
3. Add the sake, light soy sauce, and salt.
4. Stir gently once to distribute the seasonings evenly.
5. Arrange the sliced beef and shiitake mushrooms over the rice.
Important: The rice should be covered by the measured cooking liquid. Do not add extra water unless necessary, as too much liquid can make the rice mushy. - Step 5 - Cook the kamameshi rice
1. Place the covered pot over medium heat.
2. Heat until the liquid reaches a gentle boil. This usually takes several minutes, depending on the pot and stove.
3. Once boiling, immediately reduce the heat to low.
4. Keep the lid tightly closed and cook for approximately 15–20 minutes, until the rice has absorbed the liquid and the beef is cooked through.
5. Avoid lifting the lid repeatedly, as escaping steam can affect the cooking process.
6. Turn off the heat and leave the pot covered for another 10 minutes to allow the rice to finish steaming.
Chef's tip: Cooking times vary with the pot, heat source, and rice brand. If the rice is still firm but the liquid has been absorbed, add 1-2 tablespoons of ho t dashi or water, cover and cook over low heat for a few more minutes. - Step 6 - Prepare the kamameshi sauce
1. Place a small saucepan over medium heat.
2. Add the soy sauce, mirin, 10 ml dashi stock, and cornstarch.
3. Whisk until the cornstarch is completely dissolved.
4. Heat gently while stirring continuously.
5. Once the sauce begins to bubble and thicken slightly, remove it from the heat.
6. Allow it to cool for a few minutes.
7. Add a dash of ginger juice and stir until evenly incorporated.
Chef's tip: The sauce should be lightly thickened, not gluey. If it becomes too thick, loosen it with a small amount of dashi. Adding the ginger juice after cooking preserves its fresh aroma. - Step 7 - Finish the rice
1. Remove the lid after the rice has rested for 10 minutes.
2. Check that the rice is tender and the beef is fully cooked.
3. Drizzle approximately 1-2 tablespoons of the prepared kamameshi sauce over the rice, adjusting to taste.
4. Using a rice paddle or spatula, gently fold the rice from the bottom upward to distribute the sauce,beef, and mushrooms.
5. Avoid vigorous stirring, which can crush the rice grains.
Chef's tip: Add the sauce gradually. Its purpose is to enhance the dashi's umami, not overpower the natural flavor of the rice. - Step 8 - Garnish and serve
1. Serve the rice directly from the kamameshi pot or transfer it to individual bowls.
2. Add the ikura over the top.
3. Sprinkle with chopped chives.
4. Finish with finely shredded nori or a light dusting of nori powder.
5. Serve immediately while the rice is warm.
The salmon roe adds a delicate briny flavor, the chives provide freshness, and the nori contributes a final layer of savory aroma.
Notes
Sandra's kitchen notes
- - For deeper flavor: Prepare the dashi in advance and refrigerate it until needed.
- For better rice texture: Measure the liquid carefully and allow the rice to rest after cooking.
- For a richer finish: Add a little extra dashi sauce just before serving rather than mixing in all of it at once.
-For substitutions: If kombu is unavailable, use a mild Japanese dashi stock. The flavor will be different, but the dish will still be delicious.
- For food safety: Refrigerate leftover rice promptly in a shallow container and reheat thoroughly before serving.
From My Kitchen To Yours - Sandra Djohan